There’s nothing quite like the taste of freshly baked sourdough bread—crusty on the outside, soft and tangy on the inside. But for those avoiding gluten, traditional sourdough is off-limits. Enter gluten-free sourdough bread, a game-changer for anyone with gluten sensitivities or celiac disease.
Unlike regular sourdough, gluten-free versions rely on alternative flours and unique fermentation techniques to create that signature rise and tangy flavor. While it may seem tricky, mastering gluten-free sourdough is entirely possible with the right knowledge, ingredients, and techniques.
This comprehensive guide will walk you through everything—from the science behind gluten-free fermentation to the best flour choices, foolproof starter recipes, and troubleshooting tips. Whether you’re a seasoned baker or a curious beginner, you’ll learn how to create delicious, naturally fermented, gluten-free sourdough bread from scratch.
Let’s dive in!
Table of contents
- Introduction to Gluten-Free Sourdough Bread
- The Science Behind Gluten-Free Sourdough
- Choosing the Best Flours for Gluten-Free Sourdough
- Creating a Gluten-Free Sourdough Starter
- Gluten-Free Sourdough Bread Recipe
- Troubleshooting Common Problems
- Storing and Enjoying Your Gluten-Free Sourdough
- FAQs – People Also Ask
- Conclusion – Mastering Gluten-Free Sourdough Bread
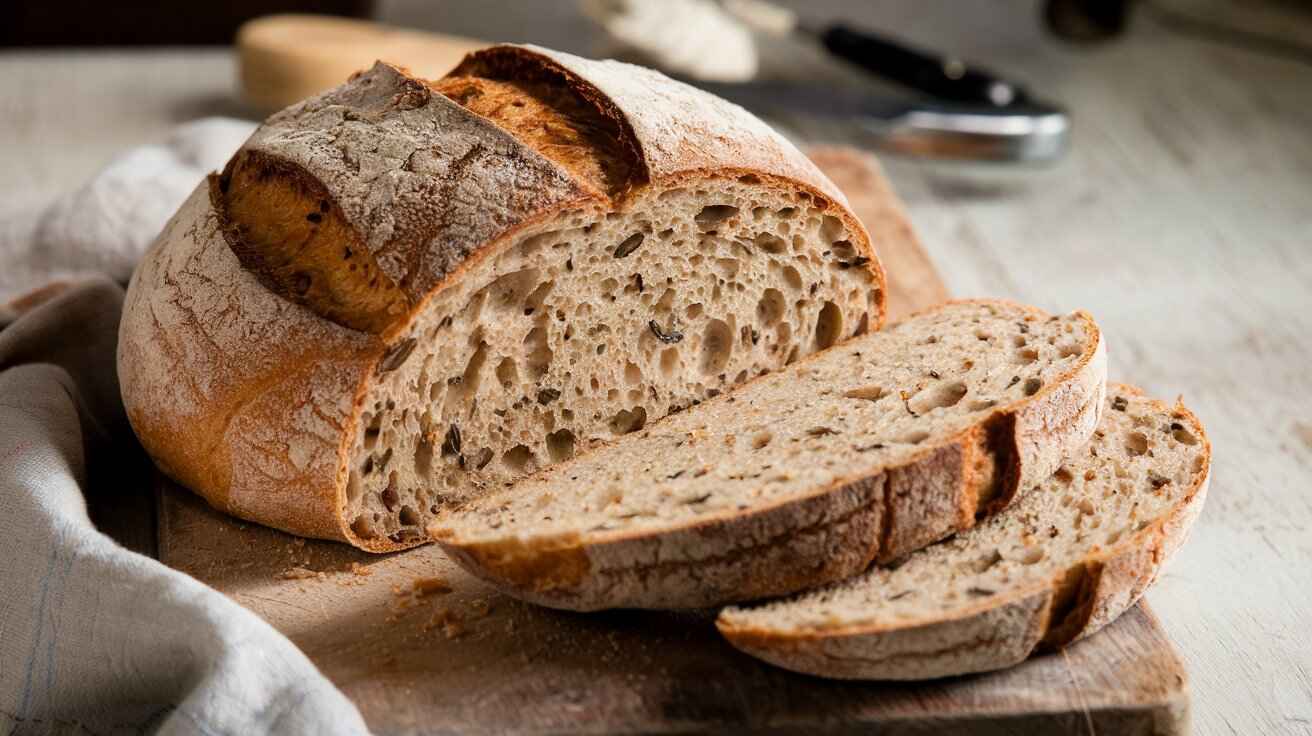
Gluten-Free Sourdough Bread
Equipment
- Mixing Bowl
- Dutch Oven
- Parchment Paper
Ingredients
Bread Dough
- 2 cups gluten-free sourdough starter
- 3 cups gluten-free flour blend brown rice, sorghum, and buckwheat
- 1.5 cups water adjust as needed
- 2 tbsp psyllium husk
- 1 tbsp olive oil
- 1 tsp salt
- 1 tsp apple cider vinegar improves dough strength
Instructions
- In a mixing bowl, combine sourdough starter, gluten-free flour blend, psyllium husk, and salt.
- Gradually add water while mixing until a sticky dough forms. Stir in olive oil and vinegar.
- Let the dough rest for 30 minutes to allow ingredients to hydrate.
- Shape the dough into a round loaf on parchment paper and let it rise at room temperature for 4-6 hours until slightly puffy.
- Transfer to the fridge for 8-12 hours for final proofing and improved flavor.
- Preheat oven to 450°F (230°C) with Dutch oven inside. Carefully place dough inside, cover, and bake for 30 minutes.
- Remove lid and bake uncovered for 15-20 minutes until crust is golden brown.
- Cool completely before slicing to avoid a gummy texture.
Notes
Introduction to Gluten-Free Sourdough Bread
What is Gluten-Free Sourdough Bread?
Traditional sourdough is made by fermenting flour and water with wild yeast and bacteria, creating a natural leavening agent. But because it relies on wheat flour, it’s a no-go for those avoiding gluten.
Gluten-free sourdough bread, on the other hand, swaps out wheat flour for naturally gluten-free alternatives like brown rice flour, buckwheat flour, and sorghum flour. The result is a bread with the same tangy taste and chewy texture—without the gluten.
Unlike conventional gluten-free bread, which often relies on commercial yeast and starch-heavy blends, sourdough fermentation enhances both the flavor and digestibility of gluten-free grains. Plus, it’s packed with gut-friendly probiotics and essential nutrients.
Why Choose Gluten-Free Sourdough?
Gluten-free sourdough is not just a substitute for regular bread. It offers several unique benefits that make it a great choice for both health-conscious eaters and those with dietary restrictions.
Better digestion is one of its biggest advantages. The fermentation process helps break down hard-to-digest compounds, making it gentler on the gut. Improved flavor is another reason why many prefer sourdough over standard gluten-free bread. The long fermentation process enhances natural flavors, creating a more complex and satisfying taste.
Healthier ingredients set gluten-free sourdough apart from many commercial gluten-free loaves, which are often loaded with additives, gums, and refined starches. Nutrient-rich flours such as buckwheat, quinoa, and teff provide fiber, vitamins, and minerals that are often missing in traditional gluten-free bread.
Overview of the Fermentation Process in Gluten-Free Baking
Sourdough fermentation is a natural process where wild yeast and lactic acid bacteria feed on flour and water, producing carbon dioxide (which helps the bread rise) and organic acids (which give it that signature sour flavor).
Gluten-free baking, however, presents unique challenges. Without gluten to create structure, bakers rely on a mix of psyllium husk, tapioca starch, and xanthan gum to bind ingredients and create an airy crumb. Hydration and fermentation time also need to be adjusted to account for the different absorption rates of gluten-free flours.
In this guide, we’ll explore the best ways to work with gluten-free sourdough, ensuring you get a perfect loaf—crispy on the outside, soft and chewy inside, and packed with flavor.
The Science Behind Gluten-Free Sourdough
How Sourdough Fermentation Works Without Gluten
Traditional sourdough relies on gluten to trap gas and create structure. But gluten-free sourdough bread takes a different approach. The wild yeast and lactic acid bacteria in a sourdough starter still ferment the flour, breaking down carbohydrates and producing carbon dioxide. However, without gluten, the dough struggles to hold onto this gas, making it harder to achieve a good rise.
To work around this, gluten-free bakers use a blend of flours and binders to create structure. Ingredients like psyllium husk, ground flaxseed, and tapioca starch act as gluten replacements, helping to hold the dough together.
The Role of Wild Yeast and Bacteria
Fermentation is the heart of sourdough, and the same applies to gluten-free sourdough bread. Wild yeast feeds on the natural sugars in the flour, producing carbon dioxide for leavening. Meanwhile, lactic acid bacteria release acids that give sourdough its signature tang and help preserve the bread naturally.
A strong, healthy sourdough starter is crucial for gluten-free bread to rise properly. Since alternative flours lack gluten’s elasticity, the fermentation process must be carefully controlled with the right flour blends, hydration levels, and fermentation times.
The Challenge of Structure in Gluten-Free Baking
The biggest challenge with gluten-free sourdough is getting the right texture. Without gluten, the dough lacks elasticity, which can lead to dense or crumbly loaves. To combat this, gluten-free flours with high protein and fiber content—like sorghum, buckwheat, and teff—help improve dough structure.
Additionally, increasing the hydration level and allowing for a longer fermentation period can lead to better rise and texture. Understanding how different gluten-free flours behave is key to mastering a great loaf of sourdough.
Choosing the Best Flours for Gluten-Free Sourdough
Best Gluten-Free Flours for Sourdough Bread
Picking the right flour is essential when baking gluten-free sourdough bread. Each flour has unique properties that affect fermentation, structure, and taste.
- Brown Rice Flour – Mild flavor, provides a light texture, and is great for sourdough starters.
- Buckwheat Flour – Adds a rich, nutty taste and helps improve structure.
- Sorghum Flour – Naturally sweet with a soft texture, good for blending with other flours.
- Teff Flour – High in protein and minerals, enhances nutrition and fermentation.
- Quinoa Flour – Boosts protein content and adds a slightly earthy taste.
Combining Flours for Better Texture and Structure
A single gluten-free flour rarely performs well on its own. A balanced blend creates the best results. Here’s a reliable formula for gluten-free sourdough bread:
- 50% Brown Rice Flour – Base flour for fermentation stability.
- 30% Sorghum or Millet Flour – Adds lightness and improves structure.
- 20% Buckwheat or Teff Flour – Enhances flavor and nutrition.
Adding a small amount of tapioca starch or psyllium husk helps bind the dough, mimicking gluten’s elasticity.
How to Adjust Hydration for Different Gluten-Free Flours
Gluten-free flours absorb water differently. Some, like brown rice and sorghum, need higher hydration to prevent dryness. Others, like quinoa or buckwheat, require careful balancing to avoid a gummy texture.
A good rule of thumb:
- Start with 80-90% hydration (meaning 80-90g water per 100g flour).
- Adjust based on dough consistency—too stiff? Add water. Too wet? Mix in a bit more flour.
Understanding these flour interactions makes all the difference in achieving the perfect gluten-free sourdough bread.
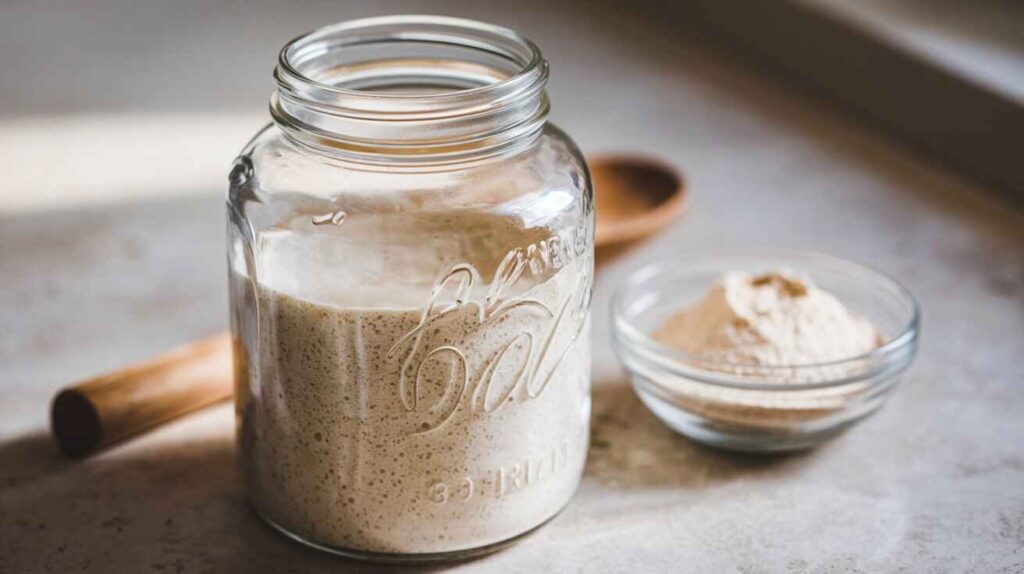
Creating a Gluten-Free Sourdough Starter
Step-by-Step Guide to Making a Starter
A strong starter is the foundation of gluten-free sourdough bread. While traditional starters rely on wheat flour, gluten-free versions require alternative grains that encourage fermentation.
Here’s how to make one from scratch:
- Day 1 – Mix ½ cup of brown rice flour with ¼ cup of filtered water in a clean glass jar. Stir well and cover loosely with a cloth. Let it sit at room temperature.
- Day 2 – Stir the mixture and add another ¼ cup of brown rice flour and 2 tablespoons of water. Mix and cover again.
- Day 3-5 – Continue feeding the starter daily with equal amounts of flour and water. By day 5, you should see bubbles and a slight rise. This means the wild yeast is active.
- Day 6-7 – Once the starter smells slightly sour and doubles in volume after feeding, it’s ready to use.
Best Flours for a Gluten-Free Starter
The type of flour you use affects the activity of the starter. The best choices include:
- Brown Rice Flour – Mild flavor and excellent for fermentation.
- Sorghum Flour – Adds depth and helps create a balanced ecosystem.
- Buckwheat Flour – High in nutrients and ferments well.
- Teff Flour – Boosts activity due to its natural wild yeast content.
Common Problems and How to Fix Them
- Starter isn’t bubbling? Try placing it in a warmer spot (70-75°F) and using a different flour.
- Starter smells bad (rotten or moldy)? Discard it and start fresh. Proper aeration is key.
- Starter is too thick or dry? Add a bit more water to adjust consistency.
How to Maintain and Store Your Starter
To keep your starter active, continue feeding it once or twice a week. If you don’t bake often, store it in the fridge and feed it weekly. Before using it, let it come to room temperature and feed it a few hours in advance for the best results.
Gluten-Free Sourdough Bread Recipe
Essential Ingredients and Tools
To bake gluten-free sourdough bread, you’ll need:
- 2 cups gluten-free sourdough starter
- 3 cups gluten-free flour blend (brown rice, sorghum, and buckwheat)
- 1½ cups water (adjust based on flour absorption)
- 2 tbsp psyllium husk (for binding)
- 1 tbsp olive oil (for moisture)
- 1 tsp salt
- 1 tsp apple cider vinegar (improves dough strength)
Tools: A large mixing bowl, a Dutch oven (or baking stone), and parchment paper.
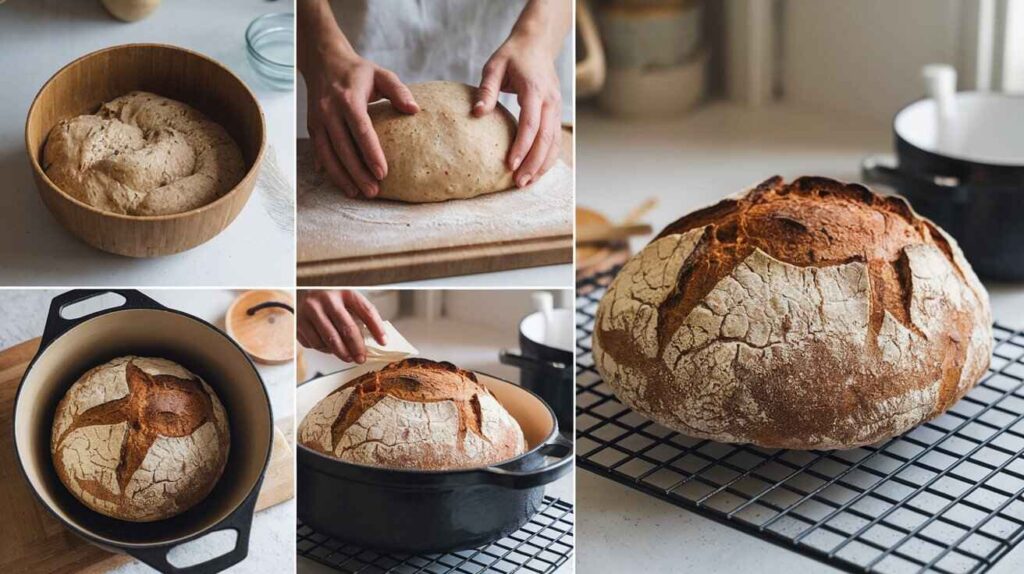
Step-by-Step Recipe for a Classic Loaf
- Mix the Dough – In a bowl, combine the starter, flour blend, psyllium husk, and salt. Add water gradually and mix well until a sticky dough forms. Let it rest for 30 minutes.
- Knead and Shape – Turn the dough onto a lightly floured surface. Knead it gently and shape it into a round loaf. Place it on parchment paper.
- First Rise (Bulk Fermentation) – Cover and let the dough rise at room temperature for 4-6 hours or until slightly puffy.
- Final Proofing – Transfer the dough to the fridge overnight (8-12 hours) for better flavor and texture.
- Bake the Bread – Preheat the oven to 450°F (230°C). Place a Dutch oven inside while it heats. Once hot, carefully place the dough inside, cover, and bake for 30 minutes. Remove the lid and bake for another 15-20 minutes until golden brown.
- Cool Before Slicing – Let the bread cool completely before cutting to prevent a gummy texture.
Pro Tips for Achieving the Perfect Rise and Crust
- Use a mature starter for a better rise. If your starter is weak, feed it a few hours before baking.
- Increase hydration if the dough feels too dry—gluten-free flours absorb more water.
- Steam during baking by placing a tray of water in the oven for a crispier crust.
Baking Time and Temperature Adjustments
Different flours require slight adjustments:
- For a lighter texture, bake at a slightly lower temperature (425°F).
- If the crust is too hard, tent the loaf with foil for the last 10 minutes of baking.
With the right techniques, you’ll enjoy homemade gluten-free sourdough bread that’s flavorful, chewy, and wholesome.
Troubleshooting Common Problems
Baking gluten-free sourdough bread can be tricky, especially when working with alternative flours and a wild yeast starter. If your loaf isn’t turning out as expected, don’t worry—most issues have simple solutions.
Why Isn’t My Dough Rising?
A flat or dense loaf is often due to an inactive starter or fermentation problems.
- Weak starter – If your starter isn’t bubbling or doubling in size after feeding, it may not be active enough. Try feeding it for a few extra days before baking.
- Room temperature is too cold – Gluten-free dough takes longer to rise, especially in cooler environments. Try placing it in a warm spot (around 75°F) or let it ferment for a longer period.
- Too much or too little hydration – Some gluten-free flours absorb more water than others. If the dough is too dry, it won’t rise well. Add a little more water and mix again.
How to Fix a Dense or Gummy Loaf
A gummy center is a common issue in gluten-free baking, often caused by too much moisture or underbaking.
- Increase baking time – If your bread is gummy inside but golden on the outside, lower the oven temperature slightly and bake for an additional 10-15 minutes.
- Let the bread cool completely – Cutting into warm bread traps steam inside, leading to a gummy texture. Always wait at least an hour before slicing.
- Adjust the flour blend – Using too much starch (like tapioca or potato starch) can create a gummy loaf. Balance it with higher-protein flours like sorghum or buckwheat.
Preventing an Overly Sour or Bland Flavor
The fermentation process determines the flavor of gluten-free sourdough bread.
- Too sour? Reduce fermentation time or refresh your starter with a fresh batch of flour.
- Not sour enough? Let the dough ferment for longer, especially in the fridge overnight.
Crust Issues: Too Hard, Too Soft, or Not Golden Enough
- Crust too hard? Brush the loaf with olive oil before baking and tent it with foil for the last 10 minutes.
- Crust too soft? Bake at a slightly higher temperature for a crispier exterior.
- Pale crust? A longer bake time or placing the loaf higher in the oven can help achieve a deeper golden color.
For a hearty breakfast, serve your freshly baked gluten-free sourdough with homemade Turkey Breakfast Sausage. The juicy, flavorful sausage pairs beautifully with the tangy, chewy bread for a filling morning meal.
Storing and Enjoying Your Gluten-Free Sourdough
After all the effort of baking, storing gluten-free sourdough bread properly ensures it stays fresh and delicious. Unlike wheat-based bread, gluten-free loaves tend to dry out faster, so proper storage is key.
How to Keep Your Bread Fresh Longer
- Store at room temperature for up to 2 days – Keep it in an airtight container or wrap it in a clean kitchen towel. Avoid plastic bags, as they trap moisture and make the crust soggy.
- Use a bread box – A bread box helps maintain the right balance of moisture, preventing the loaf from drying out too quickly.
- Refrigeration is not ideal – The fridge can cause the bread to dry out faster. If you don’t plan to eat it within a couple of days, freezing is the best option.
Best Ways to Freeze and Reheat
- Slice before freezing – This makes it easier to thaw only what you need. Place slices in a freezer-safe bag, separating layers with parchment paper.
- To reheat, use an oven or toaster – Warm a frozen slice in the toaster for a crisp crust or wrap it in foil and heat it in the oven at 300°F for 10 minutes.
Creative Ways to Use Leftover Sourdough
If your bread starts to dry out, don’t throw it away! Turn it into:
- Croutons – Cube and bake at 350°F until crispy.
- Breadcrumbs – Pulse in a food processor for homemade gluten-free breadcrumbs.
- French toast – Soak slices in an egg mixture and pan-fry for a delicious breakfast.
By storing and using your gluten-free sourdough bread the right way, you can enjoy every last slice without waste.
If you’re looking for a delicious and protein-packed way to enjoy your toasted gluten-free sourdough bread, try pairing it with this Viral Cottage Cheese Queso Recipe. Its creamy texture and rich flavor make it the perfect spread!
FAQs – People Also Ask
When it comes to gluten-free sourdough bread, many home bakers have common questions. Below are answers to some of the most frequently asked questions to help you perfect your baking.
What Are the Best Gluten-Free Flours for Sourdough Bread?
Choosing the right flour blend is key to getting the right texture and flavor in gluten-free sourdough bread. The best options include:
- Brown rice flour – A mild-flavored base flour that works well in fermentation.
- Sorghum flour – Adds a subtle sweetness and enhances structure.
- Buckwheat flour – Provides a nutty flavor and helps improve texture.
- Teff flour – Boosts the nutritional profile and fermentation activity.
- Tapioca starch – Helps create a softer, slightly chewy crumb.
A mix of these flours, along with binders like psyllium husk or flaxseed, ensures a well-balanced loaf.
How Do I Create a Gluten-Free Sourdough Starter?
A gluten-free sourdough starter is made by mixing equal parts of gluten-free flour (such as brown rice or sorghum) and filtered water, then feeding it daily for about a week until it becomes bubbly and active. Keep it at room temperature and use it once it doubles in size after feeding.
What Are the Nutritional Benefits of Using Alternative Flours in Sourdough?
Unlike refined white flour, gluten-free flours offer a range of health benefits:
- More fiber – Helps with digestion and keeps you full longer.
- Higher protein content – Supports muscle health and provides energy.
- Rich in vitamins and minerals – Flours like teff and buckwheat contain iron, calcium, and magnesium.
Since gluten-free sourdough bread undergoes natural fermentation, it’s also easier to digest than standard gluten-free bread made with commercial yeast.
How Do I Adjust Hydration Levels When Using Gluten-Free Flours?
Gluten-free flours absorb water differently, so hydration levels must be adjusted accordingly. Brown rice and sorghum need more water, while buckwheat and quinoa require less. If your dough is too dry, add small amounts of water until it reaches a slightly sticky but manageable consistency.
Conclusion – Mastering Gluten-Free Sourdough Bread
Baking gluten-free sourdough bread may seem challenging at first, but with the right knowledge and techniques, it becomes an incredibly rewarding process. By understanding fermentation, choosing the best flour combinations, and troubleshooting common issues, you can create a loaf that rivals traditional sourdough in flavor and texture.
Mastering gluten-free sourdough bread requires patience, but once you get the hang of it, you’ll enjoy fresh, homemade loaves that are healthier and more flavorful than store-bought alternatives.
If you’re ready to take your baking to the next level, start experimenting with different flour blends and fermentation times. Every loaf teaches you something new, bringing you closer to the perfect gluten-free sourdough experience.
Now, it’s time to get baking!
Got leftover gluten-free sourdough? Instead of letting it go to waste, transform it into a sweet and savory treat with this Pineapple Casserole Recipe. The mix of tangy pineapple and buttery, crispy bread creates a dish that’s both comforting and unique!